In my previous article, I shared how you can start your WordPress blog without any coding. Through that process, we also created blog, wrote few content, designed our website, and customized everything step by step.
But what if one bad plugin can destroy all your work?
Yes, this could happen, especially when you use any kind of cracked or nulled theme or plugin. It can also happen when you use cheap kind of hosting, where your shared hosting get malware attack from another developer on the same server.
So, what can we do in this case?
The best solution is to just keep our website backup. By keep generating a daily backup of our website, you have that ability or a plan to restore your website whenever anything wrong could happen. This gives you a safety net and peace of mind.
In this article, we’ll understand each and every step of how to properly back up and restore your WordPress website.
Why do you need a backup for your WordPress website?
So guys, most of you might be wondering why we need to take a backup of our website? Well, the answer is very important and let me start by giving an example.

Few years back, around 2022, I created one game chair review website and that was my microniche. I wrote around 25 plus articles on various game chairs and even used few affiliate links on it.
And suddenly, while updating one of my developer made plugin, my website got cracked, completely cracked. It was infected with malware due to some broken files that existed on that plugin.
In this scenario, I didn’t had any kind of backup for my website. And as I created this website on a VPS server without any backup plan, I was completely shocked because all of my hard work of four to five months was gone just by one fucking plugin.
That day I realized why we need a backup of our WordPress website. Because if you keep a ready backup with you, you can restore anytime.
So backup will not just restore your website, but also make sure to keep control on yourself. Because if your server get crashes or even if you did any accidental post deletion, then you can restore it by uploading your previous backup.
Read this also: Why 95% of Blogs Fail in Year One?
How to Backup Your WordPress Site for Free in 2026
So there are two traditional methods to take backup of your WordPress website. One method is from a plugin and another one is from taking it via cPanel.
We’ll take a look at both methods. So let’s start with the plugin one.
The plugin name is UpdraftPlus, and this is the most common plugin used for taking WordPress backup.
Even I’m personally using this plugin from the last seven years. And it’s actually a great plugin for WordPress ecosystem. Like it has free and paid both versions, and even the free version works like wonders.
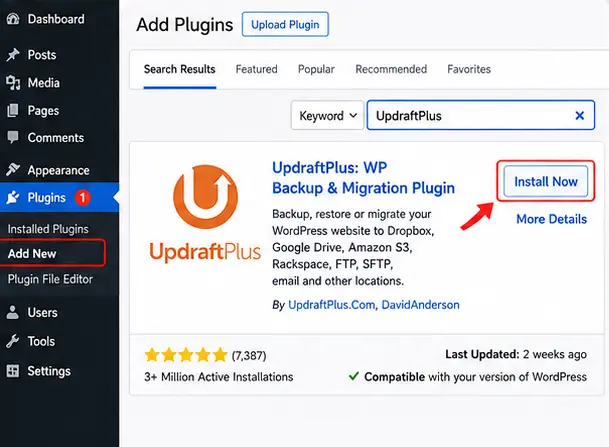
Step 1: Install the UpdraftPlus Plugin
- Just log in to your WordPress dashboard and go to the plugin section.
- In the add plugin, you have to write UpdraftPlus or you can click on the given link.
- After that, just install the plugin.
Step 2: Configure Backup Settings
Once the installation is complete:
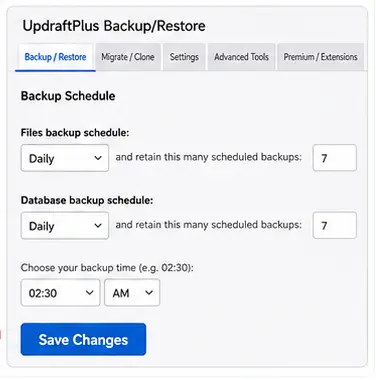
- You have to go on the settings of that UpdraftPlus plugin.
- In the backup section, you can schedule your backup or even take it on a daily basis.
Step 3: Choose a Remote Storage Location
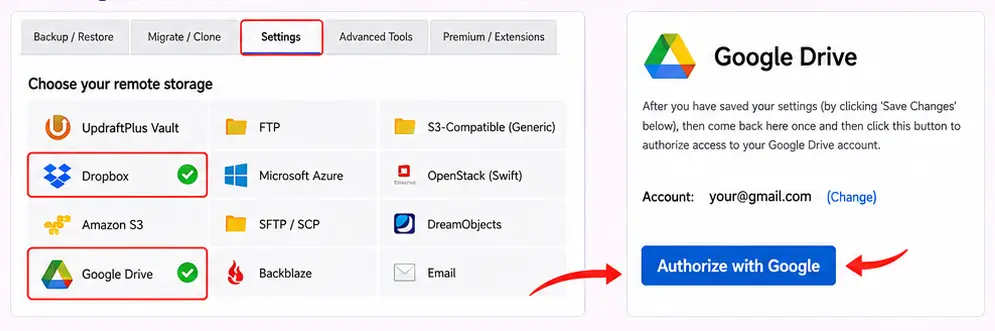
Even though there are many features which you can use, such as you can choose a backup path as a remote storage location, and for that you can choose:
- Google Drive,
- Or Dropbox.
Although you can also take manually backups on your local machine.

Important: Now, the most important step is that you have to keep taking backup manually once a month and not just manually, but also make it a scheduled daily backup on your remote cloud one. So that is
Also, make sure that UpdraftPlus splits the backup into two parts.
- Database – which includes all your posts, page settings, and etc. Basically all the content and data of your WordPress is stored in the database.
- Files – which includes your themes, plugins, and all the other files which you have used or uploaded in WordPress.
So you will get both backups into two parts.
Backup Your WordPress Website via cPanel
Now let’s talk about another method, which is taking backup via cPanel. This is the most traditional and common method people use to take backup.
As for installing WordPress, we use shared hostings coming from Hostinger or any other platform, and in that you will get cPanel.
So you don’t need to use any plugin for taking backup because you can manually take a backup through cPanel. Many shared hosting providers give you access for this.
Step 1: Backup Your Files
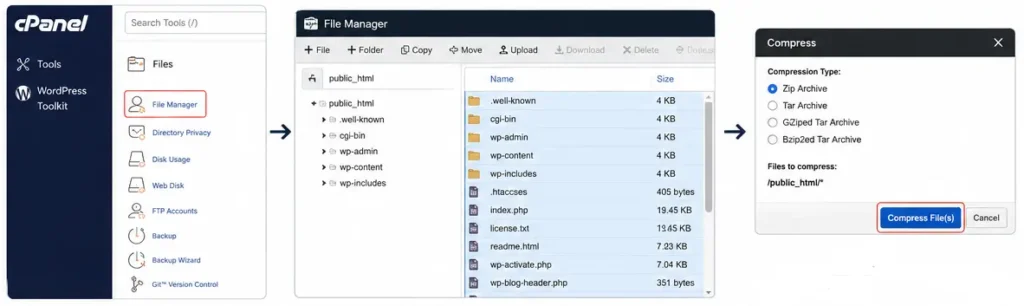
- Just log into your cPanel and open the File Manager.
- Once you reach over there, you have to open the public/html folder.
- In that, just select everything, all the files shown in the public/html, and compress it into a zip file.
- Once you download that, you will have the files backup.
Step 2: Backup Your Database
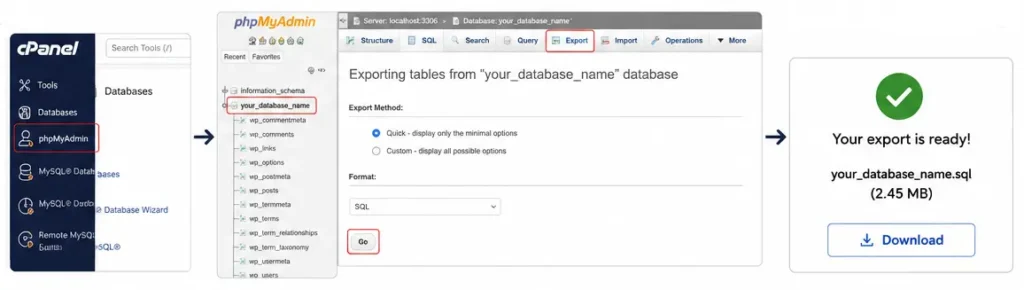
- For database, you have to log into phpMyAdmin through cPanel.
- You don’t have to put your credentials over there because in cPanel, you can directly log into phpMyAdmin without any password.
- After that, you have to select your WordPress website’s database.
- In that section, you will get option to export your SQL file.
- Once you go there, you can download your MySQL file, and this file will be your database backup for your WordPress website.
Important: Now, this might sound a little complicated, but you have to do everything manually by your own.
So just remember that keeping these both files will save lots of your data and you can even store it into your cloud storage like Google Drive or anything else.
Even I myself keep a backup of each of my websites in two, three places like a remote or in my pendrive or even my local computer. So even if anything get crashes, I still have another backup copy.
Read this Also: How to Start an Event Blog in India
Which method should you prefer?
To be honest, my answer would be more for plugin method because you don’t have to do anything much manually.
What the backup plugin does is that once you start using that plugin, you just have to click on take backup button or even you can schedule it as a daily backup.
So there is not much you have to do, but make sure that whatever cloud storage you are going to use that have enough space.
Like if your website contains lots of data, then the plugin might take a backup of 500 MB to 1 GB and it shouldn’t be short.
Also, taking manually backup is not that bad actually, but you just have to do everything manually and this might be tricky for someone who don’t have that much technical knowledge.
But even though phpMyAdmin and cPanel file manager are actually easy to understand and use. So if you do it once, I think you will remember it for your life.
How to Restore Your WordPress Website Backup
Now we have earlier understood how you can take backup for your WordPress website. Now, what about restoring it?
So let’s talk about the first method which we have used, which is UpdraftPlus plugin.
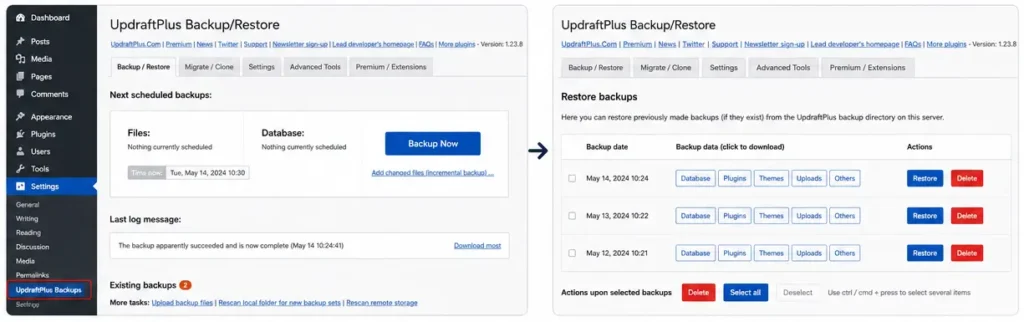
Restoring via UpdraftPlus Plugin
- Just go to the settings of that plugin.
- In that, you will see a restore option or even an option to choose a file.
- In that section, you can upload the file which you have recently downloaded.
- Once you upload that file and click on restore, each thing like database, plugins, and any other things will get restored.
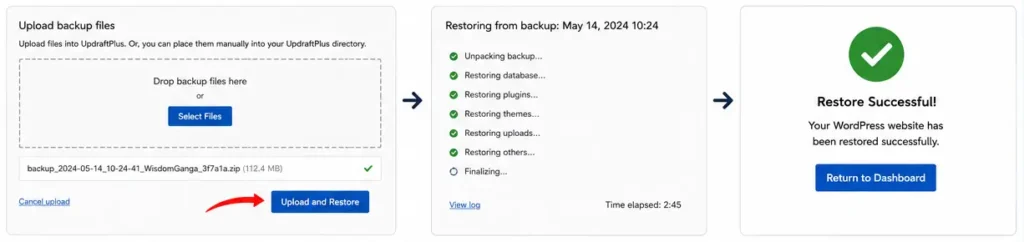
Important: But see, while uploading that backup, it might take a few time depending on your internet speed and even how the server of your WordPress website would work.
Initially, it could be from 5 minutes to 15 minutes and if the backup is larger, then it can take more up to 1 hour.
So the patience is key and this method requires more care. But you don’t have to worry about it because if you are using a good shared hosting, then this would be a clean and much more automated process for you.
Read this Also: Is Google Ignoring Your Blog?
Conclusion
So I hope guys you have understood all the basic things which we require to take a backup for our WordPress website. And these all are free tools, so you don’t have to spend a single penny on any paid plugin or anything else.
But make sure that follow each and every step properly and don’t skip taking backup because it’s a good reason to keep your website alive.
And for the cloud storage, I would suggest you to go with Google Drive as for the free plan, they’ll provide you 15 GB of storage and you can even look for Dropbox.